Welcome
Welcome to the MicStatusPro documentation. This guide will help you install, configure, and get the most out of MicStatusPro.
Getting Started Guide
Before you begin, ensure you can install applications from the Microsoft Store and have permission to make changes on your computer.
Installation Steps
- Download MicStatusPro from the Microsoft Store.
- Launch the application after installation completes.
- Find MicStatusPro in the system tray and drag it to the taskbar for quick access.
License Activation
Enter your 25-character license key when prompted during the initial setup
Verify Your Setup
After completing initial configuration, confirm MicStatusPro is working correctly:
- The correct microphone is selected
- The border changes when you mute and unmute
- Mute and unmute notification sounds play as expected
- No microphone mismatch warning is displayed
- Hotkeys work as configured (Pro)
- Zoom mute status remains synchronized (if Zoom Sync is enabled)
- The microphone state matches what you see in your meeting application
Application Overview

Basic Settings: Configure microphone monitoring, borders, themes, sounds, and startup behavior.
Pro Features: Configure advanced features including custom colors, Global Toggle, Push-to-Talk, and Multi-Monitor support.
App Tracking (Beta): Track specific application windows and configure Zoom Sync settings.
About: View version information, licensing, privacy information, support resources, and contact details..
Basic Settings (Standard Edition)
These default settings are available in all MicStatusPro editions when you first start
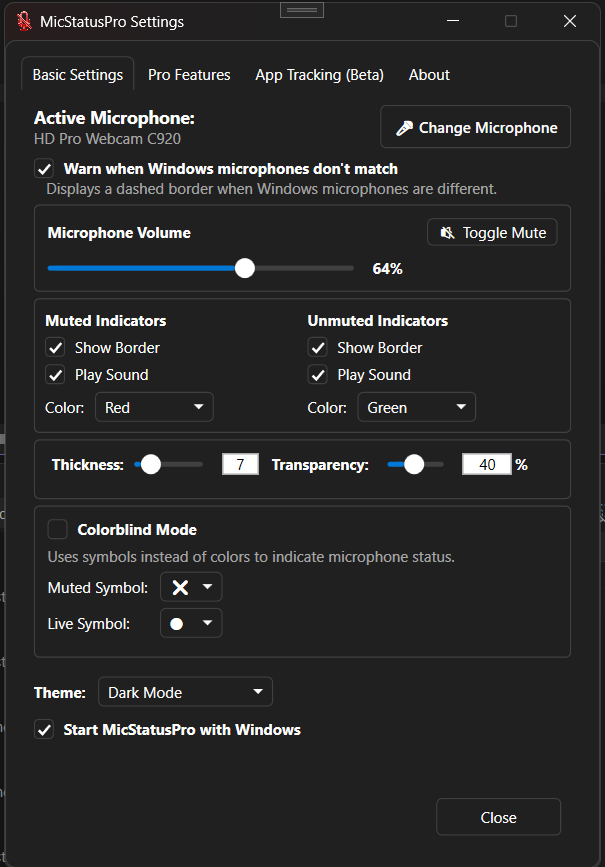
- Microphone Mismatch Detection: By default, MicStatusPro automatically detects available recording devices. If the selected microphone does not match the microphone used by your meeting application, MicStatusPro can now detect the mismatch and notify you.
- Mute/Unmute Border: By default, a red border appears when your microphone is muted and a green border appears when it is unmuted. The border is displayed on your primary monitor. Pro users can optionally display borders on all monitors.
- Mute/Unmute Sounds: Audio notifications are enabled by default so you can hear when your microphone status changes.
- Border Thickness & Transparency: The default settings are a thickness of 7 and transparency of 40%.
- Colorblind Mode: Disabled by default. Enable this option for improved visibility. For best results, set the border thickness between 10 and 20.
- Theme: By default, MicStatusPro follows your Windows theme. You can switch to Light or Dark mode at any time.
- Start with Windows: Disabled by default. Enable this option if you want MicStatusPro to start automatically when you sign in to Windows.
Pro Features
Note: Features marked as Pro require an active MicStatusPro Pro license
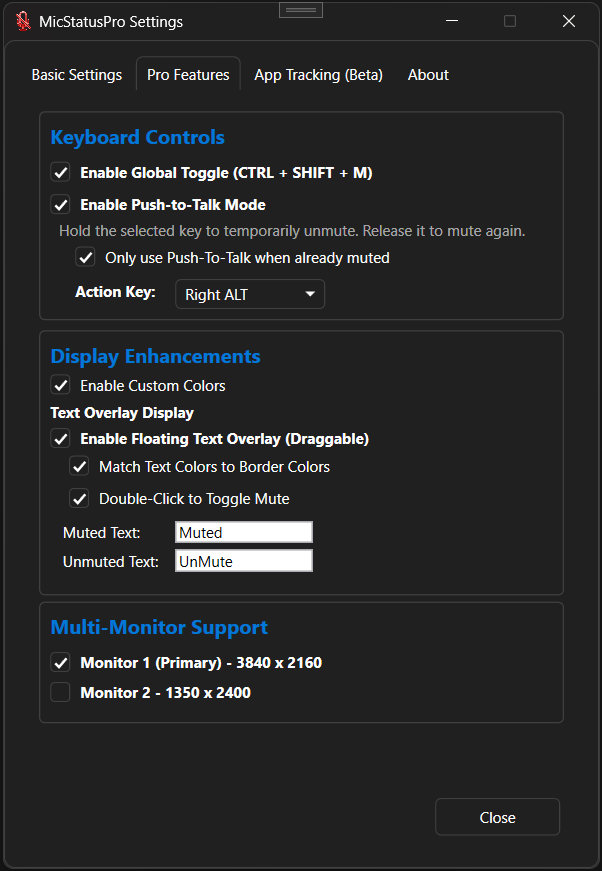
- Premium Color Engine: Customize your mute and unmute colors using the built-in color picker.
- Global Toggle: The default hotkey is Ctrl + Shift + M. You can change this shortcut, but be sure to test it as some key combinations may conflict with other applications.
- Push-to-Talk: Turn any keyboard key into a push-to-talk button. By default, the Right Alt key is used. Hold the key to speak and release it to instantly mute your microphone.
- Multi-Monitor Support: Display microphone status borders on your primary monitor or across all connected displays. MicStatusPro automatically adjusts when monitors are connected or disconnected.
- Text Overlay: Display a draggable, transparent on-screen indicator that shows "Muted" or "UnMuted." You can customize the text and colors to match your preferences. By default, double-clicking the text overlay toggles your microphone between muted and unmuted.
System Requirements
Minimum specifications for deployment:
- OS: Windows 10/11 (64-bit)
- Memory: 200 MB available RAM
- Storage: 200 MB available disk space